How to Clean Foggy Headlights (and Why It Happens)

Cloudy Headlights? Here’s What You Should Know

You’re heading out after sunset and suddenly notice your headlights look dimmer than usual, or maybe they just look plain cloudy in the daylight. You’re not imagining it. Foggy or yellow headlights are a common issue for car owners, especially in Florida’s hot, sunny climate. The good news? There are ways to fix it.

From DIY tricks using toothpaste or vinegar to full-on headlight restoration kits, you’ve probably seen dozens of tips online. But not all methods are created equal, and some could even make things worse. Before you grab the nearest scrubber, let’s talk about why your headlights get foggy in the first place, and what actually works to clean them.

Why Do Headlights Get Foggy in the First Place?

Your headlights may look like glass, but most are made from polycarbonate plastic. Over time, that plastic takes a beating from the sun, weather, and road debris, and the clear coating designed to protect it starts to break down.

Here’s what causes that cloudy or yellow look:

  • UV Exposure: Constant sunlight degrades the outer layer of plastic, especially without regular protection.
  • Oxidation: Just like rust on metal, plastic can oxidize. This leads to that dull, yellowed appearance.
  • Road Grime and Salt: Everyday driving kicks up dirt, salt, and chemicals that cling to the lens surface.
  • Micro-Scratches: Tiny scratches from dust, pollen, and road debris can wear down the smooth finish, scattering the light beam and making your headlights look hazy.

Did You Know?: Foggy headlights can reduce nighttime visibility by up to 80%, making it a safety issue, not just a cosmetic one.

If you’ve noticed your headlights aren’t as bright, or they look worn, no matter how often you clean them, you’re likely dealing with oxidation and wear on the plastic, not just dirt. That’s why regular soap and water won’t cut it.

Do These DIY Headlight Cleaning Hacks Work?

Search online and you’ll find no shortage of creative ways to clean foggy headlights using items from your kitchen or garage. While these methods can make your headlights look a little better, most of them are quick fixes that don’t last. Let’s take a look at some of the most common DIY tricks and how effective they really are.
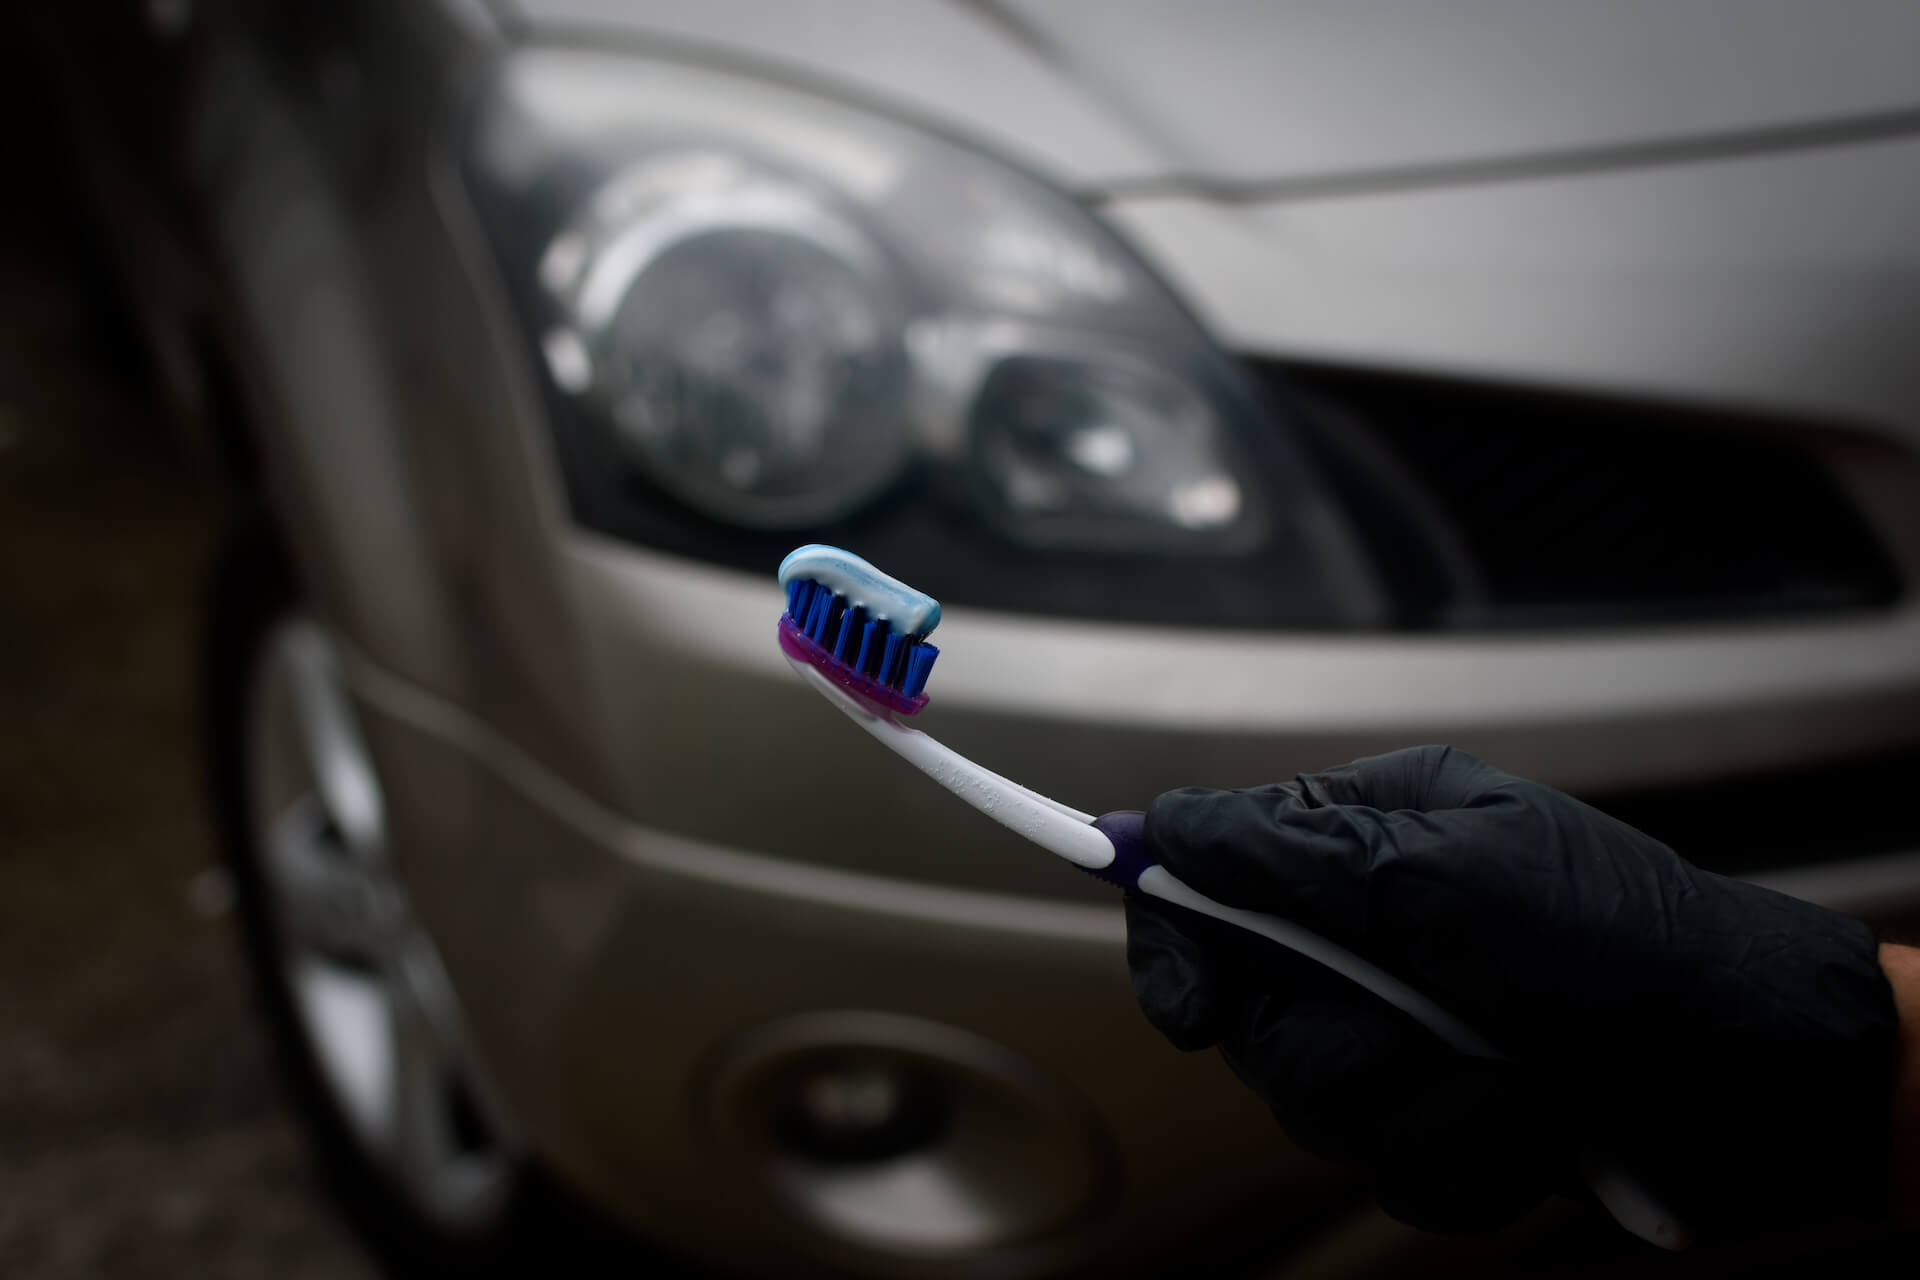
Toothpaste

How it’s used: Squeeze a small amount of plain white toothpaste (no gels or whiteners) onto a soft cloth or sponge. Rub it into the headlight using small, circular motions, then rinse and wipe clean.

Does it work? Toothpaste contains mild abrasives that can help polish away surface-level haze and fill in micro-scratches. It gives a short-term improvement in clarity and can make headlights appear less cloudy.

Watch out for: Whitening toothpastes and those with added granules can be too abrasive and may scratch the plastic.Verdict: If you’re going to try one method at home, this is the safest and most effective short-term option.

Baking Soda & Vinegar

How it’s used: Mix baking soda and white vinegar into a paste, then apply it to the headlight with a cloth or toothbrush. Scrub in circles, let it sit for a minute, then rinse thoroughly.

Does it work? The bubbling action helps lift grime and dirt from the surface, making headlights look cleaner. It can help with surface-level dullness but won’t do much against oxidation.

Watch out for: Be careful not to let the mixture drip onto your car’s paint, as it can be slightly corrosive if left sitting too long.

Verdict: This is a gentle option for cleaning dirt or bug buildup, but don’t expect major restoration.

WD-40

How it’s used: Spray a light mist of WD-40 directly onto the headlight, then wipe with a clean, dry cloth until it looks shiny.

Does it work? It adds temporary shine by masking the haze with a layer of oil. The clarity boost fades quickly and doesn’t actually clean or restore anything.

Watch out for: WD-40 leaves a slick residue that can attract more dust and grime. It’s also not designed for plastics long-term.

Verdict: Good for a quick photo or in a pinch, but not a real solution.

Coca-Cola

How it’s used: Pour Coke over the headlight or soak a cloth in it and rub it on the lens. Let it sit briefly, then scrub and rinse well.

Does it work? The phosphoric acid in Coke can help break down some grime, but it’s not strong enough to fix foggy or oxidized lenses.

Watch out for: Coke is sticky. If not rinsed thoroughly, it can leave behind residue that attracts dirt or bugs.

Verdict: More mess than it’s worth. There are better options—even among DIY methods.

Why These Methods Are Only Temporary

Most DIY headlight restoration methods only treat the surface of the lens. They might buff out a bit of haze or grime, but they don’t reverse oxidation or provide long-lasting protection. That’s why the cloudiness usually returns, sometimes within days.

If you’re on a tight budget, it’s okay to try a safe, mild method just to get by. But for long-term clarity (and better nighttime visibility), a proper headlight restoration is worth it. You’ll get deeper results and a protective finish that keeps your lights clear longer.

Can You DIY a Permanent Fix?

Yes, but it takes time, patience, and the right tools. DIY headlight restoration kits are widely available and often include everything you need:

  • Wet sanding materials (usually 600, 1000, and 2000 grit sandpaper)
  • A drill or buffer attachment for polishing
  • A UV sealant or protective coating to prevent the fog from coming back

These kits can absolutely work if you follow every step carefully, but that’s where most DIY efforts fall short. It’s easy to get impatient, skip a step, or apply too much pressure and accidentally scratch the headlight (or worse, the paint around it). The kits come with supplies, not experience.

If you’re up for the challenge and willing to stick it out, it can be a cost-effective solution. Just be ready for a bit of elbow grease.

Professional Headlight Restoration Near You

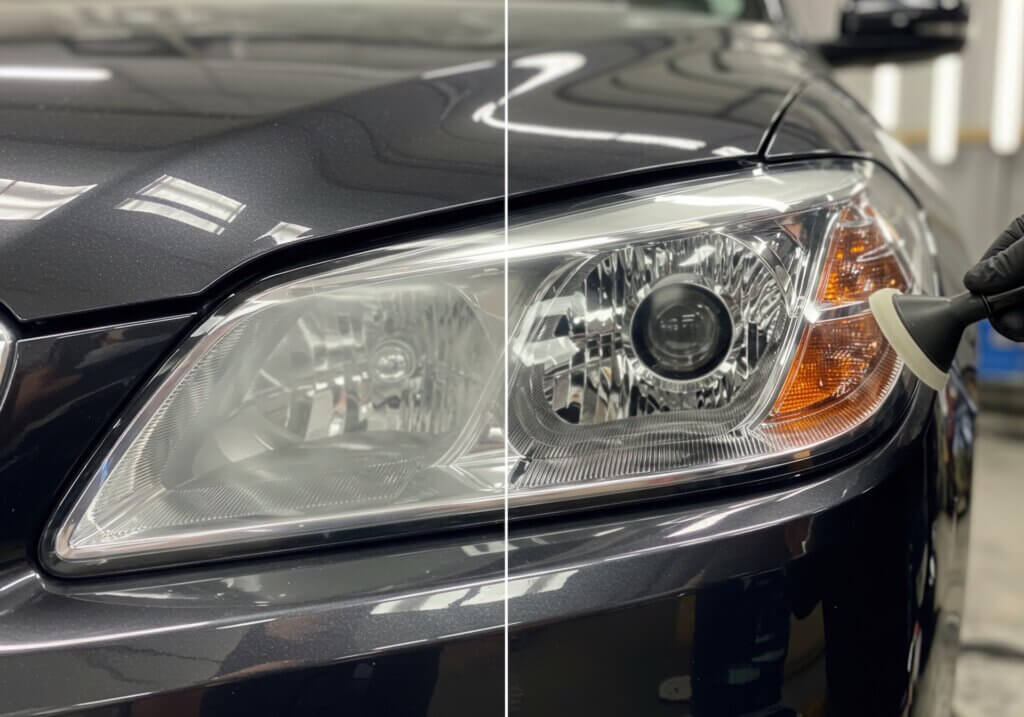
Sometimes it’s just easier and more effective to let a pro handle it. Proper restoration takes time and technique, and if you’re not confident in your skills, it’s easy to spend money on supplies only to give up halfway through.

Professional detailing includes:

  • Precise sanding and polishing with the right tools
  • Even application of UV coating for long-term clarity
  • No risk of scratching the surrounding paint or hazing the lens
  • Faster turnaround with lasting results

If you’d rather skip the mess and get it done right, Grease Pro offers professional headlight restoration with select car detailing packages at our Car Wash & Detailing location in Panama City. It’s a hassle-free way to get crystal-clear headlights without the guesswork.
Keep Your Headlights Bright (The Easy Way)

Foggy headlights aren’t just annoying. They can make night driving more dangerous and even hurt your car’s resale value. While DIY methods may give you a quick boost in clarity, long-lasting results require more than just toothpaste or a quick polish.

For a safe, reliable, and lasting fix, proper restoration and UV protection are key.Want a foolproof solution? Ask about professional headlight restoration during your next car wash or detailing visit at Grease Pro. It’s an easy add-on that saves you time, hassle, and keeps your headlights shining like new.
Can You Use Dish Soap to Wash Your Car? What to Know Before You Grab the Sponge

You’re standing in front of your car, trying to figure out how to give it a quick wash. Your eyes land on the dish soap under the sink. It cuts grease and works wonders in the kitchen, so why not use it on your car? It’s a common question, and while some people recommend dish soap (especially Dawn) for washing cars, there’s more to the story. In this post, we’ll break down the truth behind using dish soap on your car and what you should use instead to protect your paint.


So, Can You Use Dish Soap to Wash Your Car?

Short answer: You can use dish soap to wash your car, but it’s not the best choice, especially for regular cleaning.

While dish soap, like Dawn, is great for cutting through grease and heavy grime, it’s too harsh for your car’s paint in the long run. Dish soap is designed to break down oils and grease, which is fantastic for kitchenware, but it can strip away the protective wax, sealants, and coatings on your car’s paint. Without these protections, your car’s finish becomes more susceptible to damage from the elements, leading to oxidation and dulling over time.

So, is dish soap safe for cars? Not really. While it won’t immediately ruin your car, it’s definitely not the ideal option for routine washing.


When Might Dish Soap Actually Be Okay?

There are times when dish soap could be used, but it should only be a one-time solution. For example:

  • If you’re removing fresh tree sap or grease.
  • If you’re prepping the surface for a wax or wrap.

In these cases, dish soap can help strip away the contaminants, making it easier to apply new protection. However, even then, it’s still not recommended for frequent use. If you do use dish soap once, don’t worry too much—your car won’t fall apart, but regular use can lead to long-term damage.

Can I use Dawn to wash my car? Yes, you can for a one-off deep clean, but remember it’s a powerful degreaser designed for dishes, not paint care.


What Kind of Soap Should You Use to Wash a Car?

So, what kind of soap can you use to wash your car without worrying about damaging the paint? The answer is pH-balanced car wash soaps. These are specifically designed to clean your car without stripping off protective wax layers or damaging the paint.

Here’s a quick breakdown:

  • pH-balanced car wash soaps are gentle on your paint and preserve wax and sealants.
  • Foaming vs. non-foaming: Foaming soaps are great for lifting dirt and debris off the surface, while non-foaming can be easier on the paint if you’re just doing a light rinse.
  • Best soap for washing a car: Look for soaps labeled as safe for automotive use, which won’t harm the clear coat or wax finish.

Can I Use Household Items Instead?

You might wonder, can I use shampoo to wash my car, or DIY car wash soap? While some household alternatives, like baby shampoo or diluted mild soap, can be safer than dish soap, they’re still not ideal for your car’s finish. These options might not provide the necessary cleaning power and often leave behind residues that can harm your paint in the long run.

  • Homemade car wash soap: While it might seem like a cheaper option, homemade mixes often lack the protective properties needed to keep your car’s paint safe.
  • Best household soap for washing a car: If you’re in a pinch, baby shampoo is a safer alternative, but it’s still not the best long-term solution.

Remember, the right car wash liquid soap is specially designed to clean and protect your car’s exterior, and it’s worth the investment.


Why the Right Soap Matters for Long-Term Paint Health

Choosing the right soap isn’t just about cleanliness—it’s about protecting your car’s paint for the long haul. Dish soap can strip away your car’s wax and clear coat, which protects it from harmful UV rays and environmental contaminants. Over time, this can lead to:

  • Oxidation and dulling of the paint.
  • Loss of UV protection, making your car more vulnerable to the sun.
  • Swirl marks and other imperfections from improper cleaning.

By sticking to automotive-safe products, you help your car maintain its shine, defend against UV damage, and preserve its resale value.

If you’re unsure what soap to use—or just want a worry-free option—Grease Pro’s professional car washes use the right tools and products to keep your vehicle looking its best.


When to DIY and When to Choose a Pro Wash

We get it—DIY car washes are fun and satisfying. But when should you choose a professional wash instead? Here are some scenarios when a pro wash might be worth it:

  • When dealing with heavy grime, bugs, or salt.
  • If you’re protecting your car’s finish with a wax or sealant.
  • When you’re short on time but still want a thorough, even clean.

All of Grease Pro’s car washes are designed to be quick, gentle on your paint, and easy to fit into your schedule.
If you’re a regular washer, you can even join our Grease Pro Wash Club—enjoy unlimited car washes with safe, automotive-grade soaps for one low monthly price.

Plus, with GP Loyalty Rewards, you earn GP Cash back on services that you can use toward future car washes, maintenance, or repairs.

Whether you prefer to DIY or treat your car to a professional wash, the important thing is using safe methods that protect your car’s finish, and we’re always here to help you keep it looking its best.


Final Thoughts: Taking Care of Your Car Doesn’t Have to Be Complicated

Choosing the right soap for your car might seem like one more thing to worry about, but it doesn’t have to be expensive or complicated.

Plenty of affordable, pH-balanced car wash soaps are available to help you clean your car safely at home—no fancy equipment needed. The key is just making sure whatever you use is gentle on your paint and protective layers.And if you ever want a foolproof option, Grease Pro’s professional car washes make it easy to get a safe, thorough clean with automotive-grade products.

No appointment needed—just drive up and go.

Get Your Car Road-Trip Ready for Summer

Why Prepping Your Car for a Summer Road Trip Is Essential

There’s nothing worse than car trouble in the middle of a long-awaited summer road trip. High temperatures, extended driving hours, and heavy loads can put extra strain on your vehicle, increasing the risk of breakdowns. Taking the time to go through a road trip checklist before hitting the road can help you avoid unexpected repairs, improve fuel efficiency, and ensure a smoother, stress-free journey. Whether it’s getting the car ready with routine maintenance or checking key components like tires, brakes, and fluids, a little preparation can go a long way in keeping your trip safe and enjoyable.

Tires Make or Break Your Road Trip—Here’s How to Check Them

Your tires are the only point of contact between your car and the road, making them one of the most important things to check before a long trip. Underinflated, unbalanced, or worn-out tires can lead to poor handling, reduced fuel efficiency, and even dangerous blowouts. Taking a few minutes to inspect them before you leave can help you avoid these problems and keep your trip running smoothly. A quick road trip checklist for your tires should include checking air pressure, tread depth, and ensuring they’re properly balanced and rotated.

Check Air Pressure and Tread Before You Go

Properly inflated tires improve gas mileage and reduce wear, helping you get the most out of every tank of fuel. Before hitting the road, use a tire pressure gauge to ensure each tire meets the recommended PSI listed in your owner’s manual. Additionally, check the tread depth to confirm your tires have enough grip for safe handling. If the tread is too low, it may be time for a replacement to ensure optimal traction, especially on long drives.

Don’t Forget Tire Balance and Rotation

Unbalanced tires can cause vibrations at high speeds and lead to uneven wear, reducing their lifespan. Getting your tire balance checked before a long trip ensures a smoother, safer ride. Tire rotation is just as important—it helps distribute wear evenly across all four tires, extending their durability and improving overall performance. If it’s been a while since your last tire service, consider scheduling one before your trip to keep your ride comfortable and efficient.

A Brake Check Could Save Your Trip—And Your Safety

Your brakes are your first line of defense on the road, and worn-out components can put you at risk—especially on long trips. High temperatures and stop-and-go traffic add extra stress to your braking system, making a brake check essential before hitting the road.

If you hear squeaking, grinding, or feel vibrations when braking, or notice a longer stopping distance, it’s time for an inspection. Checking your brake pads and fluid levels before your trip ensures smooth, reliable stopping power—keeping you and your passengers safe.

Fluids Keep Your Engine Running—Check These Before You Go

Your engine relies on fluids to stay cool, lubricated, and running efficiently—especially in hot summer temperatures. Low or dirty fluids can lead to overheating, poor performance, and costly breakdowns. Before your trip, checking oil levels, coolant, and other essential fluids ensures your car can handle the long drive ahead.

Engine Oil and Coolant—Your Car’s Lifeline

Oil keeps your engine’s moving parts lubricated, preventing friction and wear. Check the oil level and condition before heading out—if it’s low or dirty, an oil change may be needed. Coolant is just as important, as it regulates engine temperature. Without enough coolant, your engine could overheat, leaving you stranded on the side of the road.

Transmission and Brake Fluid—Small Checks, Big Impact

A transmission fluid check ensures smooth gear shifts and prevents overheating, which is especially important for long-distance driving. Brake fluid plays a crucial role in stopping power—if levels are too low, braking performance may suffer. Checking and topping off these fluids before your trip helps keep your car running safely and efficiently.

Don’t Let a Dead Battery Ruin Your Trip

A weak battery can turn your road trip plans into a roadside headache. Extreme summer heat can accelerate battery wear, making it more likely to fail when you least expect it. Before heading out, test your battery’s charge, inspect the terminals for corrosion, and ensure all connections are secure.

It’s also a good idea to check your headlights, brake lights, and A/C system to ensure they’re functioning properly. A failing battery can lead to dim lights or weak air conditioning, both of which can make long drives less safe and comfortable. A quick battery test and inspection can help prevent unexpected stalls and keep your trip on track.

Pack These Must-Haves for a Stress-Free Road Trip

Even with the best vehicle prep, unexpected situations can happen. A well-stocked road trip checklist ensures you’re ready for anything—from a dead battery to minor roadside repairs. Packing essentials like jumper cables, a tire inflator, and a first aid kit can make all the difference if an issue arises.

Don’t forget to bring plenty of water, a flashlight, and extra phone chargers in case of delays. Keeping roadside assistance info and an emergency contact list handy adds another layer of security. With the right supplies, you can handle minor hiccups and keep your focus on enjoying the trip.

One Last Step—Get a Professional Inspection Before You Go

A DIY check is a great start, but a professional inspection can catch issues you might miss. Small problems—like uneven tire wear, low fluids, or a weak battery—can quickly turn into major setbacks on a long trip. A pre-trip inspection ensures your car is road-ready, fuel-efficient, and safe for long-distance travel.

Make sure your summer adventure goes off without a hitch. No appointment needed – stop by today. Find the location nearest you. Our technicians will check all the essentials, so you can hit the road with confidence.

What is a Misfire in a Car? Engine Misfires Explained

A misfiring engine can be alarming, causing your car to shake, lose power, or even stall. But what exactly is an engine misfire, and how do you fix it? Whether you’re experiencing rough idling or a lack of acceleration, understanding the causes of a misfire can help you take action before it leads to bigger engine problems.

What is an Engine Misfire?

An engine misfire happens when one or more cylinders in your engine fail to fire properly. This disruption can lead to poor performance, decreased fuel efficiency, and even long-term engine damage if ignored. Misfires can occur during acceleration, when idling, or under load—meaning when your engine is working harder, like driving uphill or towing.

What Causes a Misfire?

The best way to fix a misfiring engine depends on the cause. Here are some common fixes:

  • Replace spark plugs – If worn-out spark plugs are the issue, replacing them can restore smooth engine performance.
  • Check ignition coils and wires – A faulty ignition coil can prevent proper combustion.
  • Clean or replace fuel injectors – Clogged injectors can be cleaned, but in some cases, a replacement is necessary.
  • Inspect for vacuum leaks – A vacuum leak can disrupt the air-fuel balance, leading to a misfire.
  • Check engine sensors – Faulty sensors like the mass airflow sensor (MAF) or oxygen sensor can cause misfires.

Regular preventative maintenance, such as replacing spark plugs, checking ignition coils, cleaning fuel injectors, inspecting for vacuum leaks, and calibrating engine sensors, helps prevent misfires and ensures smooth engine performance. Catching these issues early can save on costly repairs and keep the engine running efficiently.

FAQs About Engine Misfires

What does a misfire feel like?

A misfire can feel like your car is jerking, hesitating, or losing power, especially when accelerating.

What does a misfire sound like?

You may hear a popping or sputtering noise from the engine, and in severe cases, backfiring from the exhaust.

Can you drive with a misfire?

While you can drive with a misfire, it’s not recommended. A misfire can lead to engine damage or even cause your car to stall.

How long can I drive with a misfiring cylinder?

If your car is misfiring, it’s best to get it checked immediately. Driving for an extended period with a misfire can cause serious engine damage.

Can bad spark plugs cause a misfire?

Yes, worn-out or faulty spark plugs are one of the most common misfire causes.

Can a misfire go away on its own?

Sometimes a temporary misfire may happen due to bad fuel or a minor issue, but consistent misfiring should never be ignored.

Can a misfire ruin an engine?

Yes, prolonged misfires can damage the catalytic converter, pistons, and other engine components, leading to costly repairs.

Get Expert Help

A misfiring engine is more than just an inconvenience—it can lead to serious performance and safety issues. If your car is experiencing misfires, don’t wait until the problem gets worse. At Grease Pro, our expert technicians can diagnose and repair misfires quickly, keeping your engine running smoothly. Visit your nearest Grease Pro location today for professional service and peace of mind on the road.

Schedule a tune-up with Grease Pro today and keep your car performing at its best.

How to Stop Windshield From Fogging Up

There’s nothing more frustrating than a foggy windshield when you’re trying to drive, especially in cold or rainy weather. You turn on the heat to defog it, but then you’re stuck sweating in a box of hot air. Rolling down the windows just makes things worse by letting in the cold. So, what can you do? Luckily, there are simple solutions to stop your windshield from fogging up—without turning your car into a sauna.

Why Does My Windshield Fog Up?

Before we dive into solutions, let’s talk about why this happens in the first place. Your windshield fogs up because of condensation—moisture in the air inside or outside your car hitting the glass and turning into tiny water droplets.

  • Inside Fog: Warm, moist air from your breath, wet clothes, or even your car’s heater meets the cold windshield.
  • Outside Fog: Cold air outside meets the warmer windshield, causing moisture in the air to condense on the outside surface.

Understanding the cause makes it easier to stop car windows from fogging up in winter or rainy weather.

A Fogged Interior Windshield

If your windshield fogs up from the inside, try these simple fixes to clear it up and keep it from coming back:

  1. Use the Air Conditioner – Even in winter, the AC helps remove moisture from the air inside your car. Turn on your defroster with the AC to clear up fog quickly.
  2. Turn Off Recirculation – Fresh air from outside is drier than the humid air inside your car. Switch off recirculation mode to bring in fresh air.
  3. Keep Windows Clean – Dirt and oil trap moisture, making fogging worse. Clean your windshield regularly with a glass cleaner to reduce buildup.
  4. DIY Anti-Fog for Windshield – A simple hack is to apply a thin layer of shaving cream on your windshield, then wipe it off. This leaves a film that prevents condensation.
  5. Absorb Excess Moisture – Leave silica gel packs or a sock filled with cat litter in your car to absorb humidity.

A Fogged Exterior Windshield

Fogging on the outside of your windshield can be just as frustrating. Here are some ways to prevent it and maintain a clear view:

  1. Warm Up Your Car First – Let your defroster and heater warm up the windshield before driving to balance the temperature difference.
  2. Use an Anti-Fog Windshield Treatment – Special anti-fog products for windshields create a hydrophobic layer that prevents fog buildup.
  3. Apply Rain Repellent – Products like Rain-X help moisture bead up and roll off, reducing outside fogging.
  4. Don’t Wipe with Your Hands – Your hands leave oil on the glass, making fogging worse. Use a clean microfiber cloth instead.

Prevention

For a long-term solution to foggy windows, follow these preventative measures to keep moisture under control:

  • Check for Leaks – Moisture buildup inside your car could be from a leak. Make sure your doors and windows seal properly.
  • Change Your Cabin Air Filter – A clogged air filter holds moisture, leading to more fogging.
  • Crack a Window Slightly – Allowing some airflow helps equalize temperature and reduce condensation.

Expert Help for a Fog-Free Drive

Don’t let a foggy windshield put your safety at risk. At Grease Pro, we’re committed to keeping your vehicle in peak condition so you can enjoy a clear, comfortable drive in any weather. From expert windshield treatments to cabin air filter replacements, our team has the knowledge and tools to help you prevent fogging and maintain optimal visibility. Stop by your nearest Grease Pro location for professional service and let us handle the details—so you can focus on the road ahead.

Schedule a tune-up with Grease Pro today and keep your car performing at its best.

What is a Tune Up Anyway?

What Is a Tune-Up on a Car?

What exactly is a tune-up, anyway? It’s a routine maintenance service that helps keep your car running smoothly and efficiently. While older vehicles needed frequent manual adjustments to things like carburetors and ignition timing, today’s cars rely on computerized systems that reduce the need for traditional tune-ups. Instead, a modern tune-up focuses on preventative maintenance—checking and replacing key components to optimize engine performance, fuel efficiency, and reliability. Many drivers assume a tune-up is just an oil change, but it’s much more than that. It’s about keeping your vehicle in peak condition before small issues turn into bigger problems.

What Does a Tune-Up Consist Of?

A tune-up is more than just a quick check under the hood—it’s a series of maintenance tasks designed to improve your car’s performance and longevity. While the exact services may vary depending on the vehicle, most tune-ups include inspecting and replacing essential components that affect engine efficiency, fuel economy, and overall drivability. Here are some key tasks typically included in a car tune-up checklist:

  • Replacing Spark Plugs – Worn or faulty spark plugs can cause misfires, reduce fuel efficiency, and lead to sluggish acceleration. Replacing them ensures your engine runs smoothly and efficiently.
  • Checking and Replacing Air Filters – A clogged air filter restricts airflow to the engine, which can negatively impact fuel economy and performance. Replacing the air filter allows for proper combustion and improved acceleration.
  • Inspecting and Adjusting the Ignition System – Modern ignition systems are designed to last longer, but components like ignition coils, wires, and timing sensors can still wear out. Checking and adjusting these parts helps maintain smooth engine operation.
  • Checking Fuel Injectors and the Fuel System – Dirty or clogged fuel injectors can lead to rough idling, poor acceleration, and increased fuel consumption. Cleaning or replacing them helps prevent engine hesitation and improves overall efficiency.

These maintenance tasks work together to keep your car running at its best, ensuring a balance of power, fuel efficiency, and reliability.

What Does a Tune-Up Do for Your Car?

A vehicle tune-up plays a vital role in keeping your car running efficiently by addressing minor issues before they turn into costly repairs. Over time, components like spark plugs, filters, and ignition parts wear down, causing your engine to work harder than necessary. A tune-up helps restore engine performance, ensuring smoother acceleration, better fuel economy, and reduced strain on key components.

Beyond immediate performance benefits, regular tune-ups can extend the lifespan of your vehicle by preventing mechanical failures. Addressing small inefficiencies—such as dirty fuel injectors or worn-out spark plugs—helps optimize combustion and reduces stress on the engine. In the long run, keeping up with routine maintenance can lead to fewer breakdowns, improved reliability, and better overall driving experience.

How Often Should You Get a Tune-Up?

The frequency of a tune-up depends on your vehicle’s make, model, and age. Newer cars with advanced onboard computers and electronic fuel injection systems typically require these less often than older models. Many modern vehicles can go 30,000 to 100,000 miles before needing a full tune-up, thanks to long-lasting spark plugs and self-adjusting engine components.

For older vehicles or those with high mileage, more frequent tune-ups may be necessary—usually every 15,000 to 30,000 miles—to ensure optimal performance. Your best guide for tune-up intervals is the owner’s manual, which outlines the manufacturer’s specific recommendations based on your car’s design. Keeping up with these service intervals helps maintain fuel efficiency, reduce wear on the engine, and prevent unexpected performance issues.

What Are the Signs That Your Car Needs a Tune-Up?

Even if you’re not experiencing major car trouble, certain warning signs can indicate it’s time for a tune-up. Ignoring these symptoms can lead to decreased performance, poor fuel economy, and potential breakdowns. Here are some common indicators that your vehicle may need a tune-up:

  • Difficulty Starting the Car – If your engine struggles to start, it could be due to worn spark plugs, a failing ignition system, or fuel delivery issues.
  • Reduced Fuel Efficiency – A sudden drop in gas mileage may mean that your engine isn’t running as efficiently as it should, possibly due to clogged air filters or dirty fuel injectors.
  • Rough Idling or Misfiring Engine – If your car vibrates or feels rough while idling, it could be a sign that the spark plugs or ignition system need attention.
  • Sluggish Acceleration or Loss of Power – If your vehicle feels slow to respond when pressing the gas pedal, it might indicate engine inefficiency caused by worn-out components.

Recognizing these signs early can help prevent more significant issues down the road. If you notice any of these symptoms, scheduling a tune-up can help restore your car’s performance and efficiency.

How Long Does It Take?

The time it takes to complete a tune-up depends on the type of vehicle and the services required. For most cars, a standard tune-up takes between one to four hours, but this can vary based on the condition of the engine and the specific maintenance tasks involved.

A basic tune-up, which includes replacing spark plugs and air filters, typically takes around one to two hours. However, if additional services like fuel system cleaning, ignition system adjustments, or diagnostics are needed, the process may take closer to three to four hours.

Scheduling ahead ensures a smooth and efficient service experience. The team at Grease Pro works quickly to diagnose and complete any necessary maintenance, helping you get back on the road with confidence.

How Much Does a Tune-Up Cost?

Tune-up prices depend on factors like your vehicle’s make and model, the parts needed, and the level of maintenance required. A basic tune-up may involve replacing spark plugs and filters, while a more in-depth service could include fuel system cleaning and ignition adjustments.

Because every car is different, the best way to determine car tune-up cost is through a professional inspection. Rather than guessing, a technician can assess your vehicle and provide a quote based on its specific needs.

Get Expert Car Care Services at Grease Pro

A tune-up is essential for keeping your car running efficiently, and professional service ensures the job is done right. Trained technicians can spot potential issues before they become costly repairs, optimizing your vehicle’s performance, fuel efficiency, and reliability.

Skipping routine maintenance or attempting DIY fixes can lead to missed problems and unnecessary wear on your engine. Professional tune-ups include a full inspection, ensuring all components—like spark plugs, filters, and ignition systems—are in top shape.

Schedule a tune-up with Grease Pro today and keep your car performing at its best.