What Do the Numbers on a Tire Mean? Understanding Tire Codes

Have you ever glanced at the side of your tire and wondered what all those numbers and letters mean? You’re not alone! Those markings might look like a random jumble of numbers, but they’re actually packed with useful information about your tire’s size, performance, and capabilities. Understanding these tire numbers can help you choose the right tire for your car, monitor tire health, and ensure your safety on the road. In this post, we’ll break it down in plain terms, so you’ll feel confident the next time you need to check or replace your tires.


Where to Find the Numbers (Tire Sidewall Basics)

The tire numbers are located on the sidewall of your tire—the outer part of the tire that faces you when you’re looking from the side—and this is where you’ll find all the important information. When you look at your tire, you’ll see a code like this:

P215/65R15 95H

This code includes details like the tire’s size, load capacity, and performance specifications. Let’s break it down next, so you can understand exactly what each part means.


Tire Size Breakdown: What the Numbers Mean

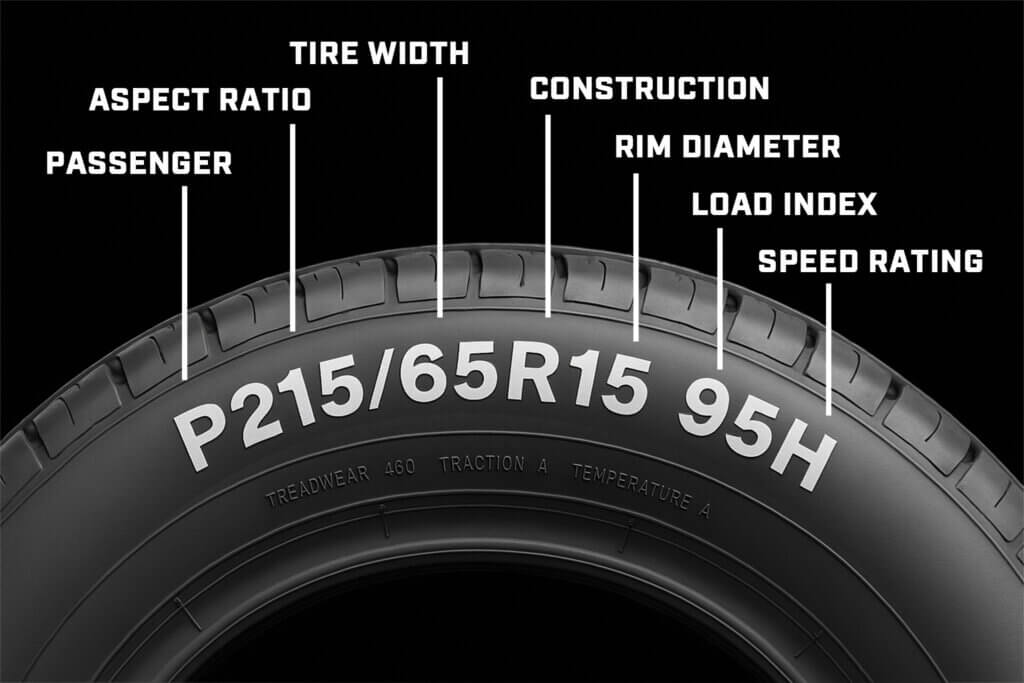
Let’s use that example: P215/65R15 95H

Here’s what each part means:

  • P – This stands for Passenger tire. It tells you that this tire is meant for passenger vehicles, such as cars and minivans.
  • 215 – This is the width of the tire in millimeters, or the first number in tire size. In this case, the tire is 215 mm wide from sidewall to sidewall.
  • 65 – This is the aspect ratio, or the middle number on the tire. It tells you the height of the sidewall as a percentage of the tire’s width. So, a 65 means the sidewall height is 65% of the width (in this case, 215 mm).
  • R – This stands for Radial construction. It means that the tire’s internal layers run radially from the center outwards, which is the most common construction type for modern tires.
  • 15 – This is the rim diameter, or the size of the wheel that the tire fits on, measured in inches. In this example, the tire fits a 15-inch rim.
  • 95 – This is the load index. It shows the maximum weight the tire can carry safely. A higher number means a higher load capacity.
  • H – This is the speed rating. It tells you the maximum speed the tire can handle safely. An “H” rating means the tire is rated for speeds up to 130 mph.

What If Your Tire Code Looks Different?

While many tire codes follow a similar format, there are a few common variations you might see:

  • No “P” at the beginning:
    Some tires skip the letter. No “P” simply means the tire wasn’t specially designated for Passenger use, but it’s still common on many vehicles.
  • “LT” instead of “P”:
    “LT” stands for Light Truck. These tires are designed for heavier vehicles like pickups, SUVs, and vans. They have higher load ratings.
  • Different speed ratings:
    Instead of “H,” you might see letters like “T,” “V,” or “W.” Each letter corresponds to a maximum speed rating. (Example: “T” = 118 mph, “V” = 149 mph.)
  • No “R” for Radial:
    Almost all modern tires are Radial (R), but some old or specialty tires might show “D” (for Diagonal/Bias Ply). “R” is still the overwhelming standard today.
  • Truck Tire Codes:
    Some heavy-duty truck tires might use slightly different markings, especially commercial truck tires (they sometimes show the load range with letters like “E” for 10-ply rating).

What Else Is on the Tire? (Codes & Extra Info)

Besides the tire size, you’ll often see other important information stamped into the sidewall. Here’s what some of those codes mean:

  • DOT Date Code:
    This shows when the tire was manufactured. It’s usually a 4-digit number following “DOT”—the first two digits are the week, and the last two are the year.
    (Example: 2519 means the 25th week of 2019.)
    Knowing your tire’s age is important because even tires with good tread can become unsafe after about 6–10 years.
  • Max PSI:
    This indicates the maximum air pressure the tire can safely handle, measured in pounds per square inch (PSI).
    Always inflate your tires according to your car manufacturer’s recommendation, not necessarily the max PSI, to balance performance and safety.
  • Temperature and Traction Ratings:
    These ratings show how the tire performs under different conditions:
    • Traction Rating (AA, A, B, C):
      Tells you how well the tire can stop on wet roads.
      • AA = Best wet traction
      • A = Excellent
      • B = Good
      • C = Acceptable, but lower performance
    • Temperature Rating (A, B, C):
      Shows how well the tire resists heat buildup at high speeds.
      • A = Best heat resistance
      • B = Moderate heat resistance
      • C = Basic heat resistance (typically for lower-speed tires)
  • Tire Position Number:
    Some tires, especially when installed by manufacturers, may have a number or mark to suggest a preferred position (like left front, right rear, etc.).
    Not all tires have this, but it’s useful when rotating tires or replacing a single tire.

When Should You Double-Check with a Pro?

Even if you feel comfortable reading your tire numbers, there are times when checking with a professional is a smart move.

Here’s when it’s a good idea to get a second opinion:

  • When you’re switching tires for seasonal reasons:
    While in Florida most drivers stick with all-season tires year-round, if you’re traveling to colder climates or moving between summer and winter tires elsewhere, it’s important to make sure you have the right type for your driving conditions.
  • When you’re driving an AWD (All-Wheel Drive) vehicle:
    AWD systems depend on all four tires being the same size and type. A mismatch—even slightly—can strain the drivetrain and lead to expensive repairs.
  • When you’re replacing just one tire:
    Matching tread depth, size, and performance is important to keep your car handling safely. One wrong tire can throw off the balance.
  • If you’re unsure which tire fits your vehicle best:
    Between load ratings, speed ratings, and tire types, it’s not always obvious. A pro can make sure you’re choosing the safest, most reliable option for your specific make and model.

At Grease Pro, we’re here to help you check your tire size, explain any codes you’re unsure about, and match you with the right tires for your vehicle.

We’ll make sure they’re installed safely and correctly—no appointment needed!


Feel More Confident About Your Tires

Understanding tire numbers might seem complicated at first, but once you know what to look for, it’s much easier.

A little knowledge goes a long way toward keeping your vehicle in good shape and making smarter choices when it’s time for new tires.

If you ever need help checking your tire size, finding the right replacement, or just understanding what’s on your sidewall, Grease Pro is here for you.
Stop by any of our locations in Panama City, Lynn Haven, Panama City Beach, or Chipley—no appointment necessary.

We’ll make sure you leave confident and road-ready.For more info on tire services, visit our Tire Services Page.

Get Your Car Road-Trip Ready for Summer

Why Prepping Your Car for a Summer Road Trip Is Essential

There’s nothing worse than car trouble in the middle of a long-awaited summer road trip. High temperatures, extended driving hours, and heavy loads can put extra strain on your vehicle, increasing the risk of breakdowns. Taking the time to go through a road trip checklist before hitting the road can help you avoid unexpected repairs, improve fuel efficiency, and ensure a smoother, stress-free journey. Whether it’s getting the car ready with routine maintenance or checking key components like tires, brakes, and fluids, a little preparation can go a long way in keeping your trip safe and enjoyable.

Tires Make or Break Your Road Trip—Here’s How to Check Them

Your tires are the only point of contact between your car and the road, making them one of the most important things to check before a long trip. Underinflated, unbalanced, or worn-out tires can lead to poor handling, reduced fuel efficiency, and even dangerous blowouts. Taking a few minutes to inspect them before you leave can help you avoid these problems and keep your trip running smoothly. A quick road trip checklist for your tires should include checking air pressure, tread depth, and ensuring they’re properly balanced and rotated.

Check Air Pressure and Tread Before You Go

Properly inflated tires improve gas mileage and reduce wear, helping you get the most out of every tank of fuel. Before hitting the road, use a tire pressure gauge to ensure each tire meets the recommended PSI listed in your owner’s manual. Additionally, check the tread depth to confirm your tires have enough grip for safe handling. If the tread is too low, it may be time for a replacement to ensure optimal traction, especially on long drives.

Don’t Forget Tire Balance and Rotation

Unbalanced tires can cause vibrations at high speeds and lead to uneven wear, reducing their lifespan. Getting your tire balance checked before a long trip ensures a smoother, safer ride. Tire rotation is just as important—it helps distribute wear evenly across all four tires, extending their durability and improving overall performance. If it’s been a while since your last tire service, consider scheduling one before your trip to keep your ride comfortable and efficient.

A Brake Check Could Save Your Trip—And Your Safety

Your brakes are your first line of defense on the road, and worn-out components can put you at risk—especially on long trips. High temperatures and stop-and-go traffic add extra stress to your braking system, making a brake check essential before hitting the road.

If you hear squeaking, grinding, or feel vibrations when braking, or notice a longer stopping distance, it’s time for an inspection. Checking your brake pads and fluid levels before your trip ensures smooth, reliable stopping power—keeping you and your passengers safe.

Fluids Keep Your Engine Running—Check These Before You Go

Your engine relies on fluids to stay cool, lubricated, and running efficiently—especially in hot summer temperatures. Low or dirty fluids can lead to overheating, poor performance, and costly breakdowns. Before your trip, checking oil levels, coolant, and other essential fluids ensures your car can handle the long drive ahead.

Engine Oil and Coolant—Your Car’s Lifeline

Oil keeps your engine’s moving parts lubricated, preventing friction and wear. Check the oil level and condition before heading out—if it’s low or dirty, an oil change may be needed. Coolant is just as important, as it regulates engine temperature. Without enough coolant, your engine could overheat, leaving you stranded on the side of the road.

Transmission and Brake Fluid—Small Checks, Big Impact

A transmission fluid check ensures smooth gear shifts and prevents overheating, which is especially important for long-distance driving. Brake fluid plays a crucial role in stopping power—if levels are too low, braking performance may suffer. Checking and topping off these fluids before your trip helps keep your car running safely and efficiently.

Don’t Let a Dead Battery Ruin Your Trip

A weak battery can turn your road trip plans into a roadside headache. Extreme summer heat can accelerate battery wear, making it more likely to fail when you least expect it. Before heading out, test your battery’s charge, inspect the terminals for corrosion, and ensure all connections are secure.

It’s also a good idea to check your headlights, brake lights, and A/C system to ensure they’re functioning properly. A failing battery can lead to dim lights or weak air conditioning, both of which can make long drives less safe and comfortable. A quick battery test and inspection can help prevent unexpected stalls and keep your trip on track.

Pack These Must-Haves for a Stress-Free Road Trip

Even with the best vehicle prep, unexpected situations can happen. A well-stocked road trip checklist ensures you’re ready for anything—from a dead battery to minor roadside repairs. Packing essentials like jumper cables, a tire inflator, and a first aid kit can make all the difference if an issue arises.

Don’t forget to bring plenty of water, a flashlight, and extra phone chargers in case of delays. Keeping roadside assistance info and an emergency contact list handy adds another layer of security. With the right supplies, you can handle minor hiccups and keep your focus on enjoying the trip.

One Last Step—Get a Professional Inspection Before You Go

A DIY check is a great start, but a professional inspection can catch issues you might miss. Small problems—like uneven tire wear, low fluids, or a weak battery—can quickly turn into major setbacks on a long trip. A pre-trip inspection ensures your car is road-ready, fuel-efficient, and safe for long-distance travel.

Make sure your summer adventure goes off without a hitch. No appointment needed – stop by today. Find the location nearest you. Our technicians will check all the essentials, so you can hit the road with confidence.

Why Are New Tires Leaking Air?

Why New Tires Sometimes Lose Air and What It Means for Your Drive

Finding that your brand-new tires are losing air can be frustrating and even a bit concerning. Air leaks in new tires may seem unusual, but they’re more common than you might think, often due to factors like minor installation issues or environmental conditions. Knowing the possible reasons behind these air leaks can help you take the right steps to maintain safe and reliable driving. In this guide, we’ll cover some of the most common causes and what you can do about them.

Tire Bead and Rim Seal Problems

The tire bead plays a crucial role in keeping air sealed inside your tire. Positioned where the tire meets the rim, the bead is designed to create an airtight seal. However, if the bead doesn’t fit snugly against the rim, it can allow air to slowly escape—something often referred to as “tire bead leaking.” This issue can occur during installation if the bead doesn’t set properly or if there’s even a small piece of debris trapped between the tire and rim. While it may seem like a minor imperfection, even the smallest gap can lead to noticeable air loss over time.

Valve Stem Issues

The valve stem is a small but essential component of your tire, allowing you to add or release air as needed while keeping the tire sealed tightly. However, even a minor defect in the valve stem can lead to a slow leak in your tire, causing air to gradually escape. Sometimes, new tires may have valve stems with small imperfections, or debris might get lodged inside, preventing a complete seal. If left unchecked, a leaky tire due to valve stem issues can become a persistent problem, requiring regular air refills and eventually leading to uneven wear or reduced tire life.

Environmental Effects on Tire Pressure

Temperature changes, especially during colder months, can significantly impact tire pressure. As the temperature drops, the air inside your tires contracts, leading to a decrease in pressure. This is why many drivers notice that their tire pressure seems lower in the morning or overnight. In colder weather, it’s also common to see just one tire losing air faster than others, especially if it’s on the side of the vehicle most exposed to the cold. While this air loss is temporary and doesn’t indicate an actual leak, it’s still essential to monitor and adjust your tire pressure regularly in winter to ensure safe and smooth driving.

Identifying and Addressing Air Loss in New Tires

If you’re noticing air loss in your new tires, there are a few steps you can take to identify the source and keep your tires in optimal condition. Simple at-home checks can often pinpoint the issue, but in some cases, professional assistance may be necessary to find and fix hidden leaks. Here’s a look at both DIY methods and when it’s best to seek expert help.

DIY Checks for Slow Leaks

One of the easiest ways to check for a slow leak is by using a soapy water solution. Apply it around the tire surface, especially near the bead and valve stem, and watch for bubbles forming—these indicate an air leak. It’s also a good idea to keep a tire pressure gauge on hand to regularly monitor each tire’s pressure, especially in colder weather or right after installation. This simple check can help catch any issues early before they lead to greater air loss.

When to Seek Professional Help

If air loss continues despite routine checks, it may be time to bring your tire to a professional. Some leaks can be tricky to locate or may stem from internal issues requiring specialized tools. A professional inspection can thoroughly examine areas like the bead, valve stem, and rim to detect any hidden leaks or minor defects. In the long run, expert help can ensure your tires stay secure and road-ready, saving you time and potential tire wear. Schedule your service with Grease Pro today to have our team inspect and address any persistent air loss issues, so you can drive with confidence.

How Grease Pro Can Help with Tire Maintenance

Grease Pro offers a full range of tire services to keep your tires performing their best. From routine pressure checks and diagnostics to thorough repairs and complete replacements, our team is equipped to handle all aspects of tire care. Whether you’re dealing with a bead leak, valve stem issue, or general air pressure concerns, our professionals have the expertise and tools needed to address any problem efficiently. Trusting Grease Pro for your tire maintenance ensures your new tires stay road-ready and helps extend their lifespan for safer, smoother driving.

Keep Your Tires in Top Shape by Addressing Air Leaks Early

Air leaks in new tires can stem from a variety of sources, including bead and valve stem issues, or even seasonal weather changes. By identifying and addressing these causes promptly, you can ensure a safer, smoother ride and prolong the life of your tires. Regular maintenance and quick action on any air pressure changes go a long way in preventing further issues down the road. If you’re experiencing persistent air loss or have concerns about your tires, don’t hesitate to contact Grease Pro for expert assistance. Our team is here to help keep your tires—and your drive—at their best.

Why is My TPMS Sensor Light On? What to Do and How to Fix It

Ever noticed a small light on your dashboard that looks like a tire with an exclamation mark? That’s your Tire Pressure Monitoring System (TPMS) doing its job. This nifty feature is crucial not just for your car’s efficiency but for your safety on the road. While seeing a warning light on your dash might be alarming, think of it as a heads-up from your car, warning you before a small issue like low tire pressure turns into a bigger problem, like poor fuel economy or even a dangerous tire blowout. Most of the time, this light turns on for simple reasons—maybe the air in your tires has dipped a bit, or a change in the weather has affected your tire pressure. Getting to know why this light comes on and what to do can make your drives smoother and safer, so let’s take a closer look.

What is the TPMS Light?

Your TPMS, or Tire Pressure Monitoring System, is a sensor that monitors the air pressure within your tires. While most modern vehicles are equipped with this feature, it’s important to note that not all cars have a TPMS. Each sensor is usually located in the valve stem or attached to the wheel inside the tire. If the air pressure in any of your tires drops significantly below the manufacturer’s recommended level, the TPMS activates to alert you. This prompt helps ensure your vehicle remains safe to drive, encouraging a quick check and adjustment of the tire pressure as needed.

A car tire tpms sensor on an suv wheel valve cap
TPMS sensor on the valve cap

Mechanic fits tire pressure monitoring system attached to the wheel
TPMS sensor attached to a wheel

Key Reasons Why Your TPMS Light Is On

  • Low Tire Pressure: The most common reason for the TPMS light to come on is simply that the air pressure in one or more of your tires is too low. This can happen due to normal air loss over time or a small leak.
  • Temperature Changes: As the seasons change, so does the air pressure in your tires. Cold weather can cause your tire pressure to drop, while hot weather might increase it. Both scenarios can trigger your TPMS light.
  • Sensor Issues or Malfunctions: Although less common, sometimes the TPMS itself might have a hiccup. This could be due to a failing battery in the sensor or other electronic issues within the system.

What to Do When Your TPMS Light Turns On

When that TPMS light flicks on, your first move should be to check the air pressure in your tires. Here’s a simple way to do it:

  1. Grab a Reliable Tire Gauge: Always have a good tire pressure gauge on hand for accurate readings.
  2. Check Each Tire: Pop off the valve stem caps and press the gauge firmly onto each one.
  3. Compare Pressure to Recommendations: Look up the recommended pressure in your vehicle’s manual or on the sticker inside the driver’s door.
  4. Adjust as Needed: If your tires are a bit low, pump them up to the right level or let some air out if they’re too high.

Keeping your tires at the right pressure isn’t just about avoiding that annoying light—it’s essential for your tires’ longevity, your car’s fuel efficiency, and keeping you safe while you drive.


Looking for more easy-to-follow tire tips? Watch our quick video on essential tire checks you can do yourself—it’s all explained in under a minute!


TPMS Light Troubleshooting Tips: Why does my tire pressure light keep coming on?

Tire Pressure Light Stays On

Seeing your TPMS light stay on can be a little concerning. It generally means that one or more of your tires are running low on air. But if you’ve already topped up the air and the light’s still on, there might be more to it:

  • Double-check your tire pressures: After filling your tires, it’s always a good idea to go over the pressures again to make sure they’re just right. Sometimes, you can fill one tire just for another to become low on air.
  • Inspect for leaks: Take a good look at your tires for any signs of punctures or debris that might cause a slow leak. No one wants to find a nail in their tire, but it’s important to find any leaks quickly to ensure a safe drive.

TPMS Light That Goes On and Off

Changes in temperature can lead your TPMS light to flicker on and off as the air pressure in your tires adjusts to the weather:

  • Temperature Impact: Expect the air pressure to drop in cooler weather and rise when it’s warm, which can trigger your TPMS light.
  • Monitor Closely: Keep a close watch on both the light and the external temperatures. Checking your tire pressure becomes even more important when the weather fluctuates, as it’s known to do in Northwest Florida.
  • Sensor Check: A sensor might also be sending out false signals if the light doesn’t settle despite your tires having stable pressures. This is particularly likely if the light flickers when you turn your car on and then stays lit after a few minutes.
  • Consider sensor issues: In general, the TPMS sensor light should turn off within minutes after filling your tires. However, the sensor itself could malfunction, giving off false alarms or not resetting properly. If the light remains on even after you’ve adjusted the pressure, this could be the case.

When to See a Professional

If you’ve done all you can and the light’s behavior still doesn’t make sense, or you suspect the sensors are faulty, getting a professional opinion is a wise move.

Common Misconceptions About Your TPMS: Myths vs. Facts

You know your TPMS helps keep tabs on your tire pressure, but there are a few myths out there that might give you the wrong idea about what it can really do. Here are some common myths about TPMS and the facts to set them straight:

Myth: TPMS completely replaces the need for manual checks.

Fact: While TPMS is a great tool for monitoring tire pressure, it doesn’t replace the need for regular manual checks with a tire gauge. TPMS alerts you when your tire pressure is significantly low, but manual checks can help you maintain optimal tire pressure and catch issues that TPMS might not detect immediately.

Myth: TPMS monitors tire health beyond just pressure.

Fact: TPMS specifically monitors tire pressure only. It doesn’t assess the overall health of your tires, such as tread depth or structural integrity. Regular inspections by a professional are necessary to evaluate these aspects and ensure your tires are in safe driving condition.

Understanding these facts helps you maintain your vehicle more effectively and prevents relying too heavily on automation that’s meant to assist, not replace regular maintenance practices.

What Happens If I Ignore the TPMS Light?

When the TPMS light turns on, there’s no need to panic. It’s generally okay to continue driving for a short distance, but you should aim to check your tire pressure within a day or so. This helps you avoid driving on tires that might be dangerously low on air. While it’s not a crisis, it certainly shouldn’t be ignored. Ignoring the TPMS light may not seem like a big deal at first, but it can lead to several problems down the road:

  • Fuel Efficiency Takes a Hit: Tires that aren’t properly inflated have to work harder, which means your car burns more fuel. Keeping them at the right pressure helps ensure your vehicle runs efficiently.
  • Uneven and Accelerated Tire Wear: Low tire pressure can cause your tires to wear unevenly and prematurely. This not only shortens the life of your tires but could also mean more frequent replacements and increased costs. No one wants to have to buy new tires sooner than they have to.
  • Reduced Handling and Safety: Proper tire pressure is crucial for good handling and safe driving, especially in sudden stops or turns. Low pressure compromises these aspects, making your vehicle less safe.
  • Potential for Tire Failure: The worst-case scenario, a tire blowout, could happen if you ignore your TPMS light long enough. Driving on severely under-inflated tires increases the stress and heat, leading to potential tire failure, which can be dangerous at high speeds.

Keep Your Tires in Check with Grease Pro

So before you hit the road, make sure your tires are properly inflated to prevent your TPMS light from making an appearance. Remember, you can typically find the correct tire pressure for your vehicle in the owner’s manual or on a sticker inside the driver’s side door jamb. And if you’re ever unsure about how to check or adjust your tire pressure, Grease Pro is here to help.

Our team is well-equipped to handle all your tire pressure monitoring needs, from routine checks to sensor troubleshooting and more. Don’t wait for a small issue to turn into a major one—let us take care of your tires so you can drive with confidence and safety.

Schedule a service online or simply stop by the location closest to you!

Don’t Let the Cold Get to Your Tires: Understanding Tire Pressure In Cold Weather

The Impact of Cooler Weather on Tire Pressure

Even when the weather isn’t freezing, a drop in temperature can significantly affect your tire pressure. It’s a common misconception that tire pressure issues only occur in icy conditions. In reality, even a slight shift from summer heat to cooler weather can lead to decreased tire pressure. This can be especially noticeable after sudden cold fronts.

Why Tire Pressure Drops in Cooler Temperatures

Tire pressure can drop in cooler weather due to the contraction of air. As the air inside the tire gets colder, it takes up less space, leading to lower pressure. This phenomenon often catches drivers off guard, especially during the transition from warm to cooler seasons.


Recognizing the Signs of Low Tire Pressure

Being able to identify when your tires are low on pressure is key to maintaining vehicle safety and efficiency. In this section, we’ll explore the warning signs and indicators that your tires need attention, helping you stay proactive in your tire maintenance.

The Role of TPMS and SVC Tire Monitor Systems

Most modern vehicles are equipped with a Tire Pressure Monitoring System (TPMS) or SVC tire monitor that alerts you when tire pressure is low. The low tire pressure symbol on your dashboard is not something to ignore. It’s an essential tool for maintaining optimal tire pressure and ensuring safety.

Understanding Tire Pressure Loss

Sometimes, tires might lose pressure but show no signs of a leak. This can occur overnight due to temperature changes and is more common in cooler weather. However, if you find yourself frequently refilling your tires after a cold spell or notice that they are consistently low, the issue might extend beyond just the cold. While there might not be immediate cause for alarm, regular checks are the best way to ensure tire pressure is within the recommended range and to rule out the possibility of a slow leak that’s been missed.


Managing Tire Pressure in Cold Weather

Effectively managing tire pressure as the temperature drops is crucial for safe winter driving. Here, we discuss practical steps and strategies to maintain optimal tire pressure during the colder months, ensuring your vehicle remains reliable and ready for the road.

How to Respond to Low Tire Pressure Alerts

When your TPMS light comes on, it’s crucial to check your tire pressure as soon as possible. Driving with low tire pressure can be dangerous and can also lead to increased tire wear and reduced fuel efficiency. Knowing what tire pressure is too low for your vehicle is essential for your safety on the road.

Addressing Sudden Tire Pressure Drops

If you notice a sudden drop in tire pressure, especially after a sharp decrease in temperature, it’s important to adjust it to the correct level. However, understanding how long you can drive with low tire pressure is crucial to prevent damage to your tires and ensure a safe driving experience.


Cold vs. Hot Tire Pressure: Balancing the Changes

Adjusting to Temperature Variations

It’s important to understand the difference between cold and hot tire pressure. Tires tend to expand in hot weather and contract in cold, which means tire pressure can vary significantly between seasons. Regular checks and adjustments are necessary to maintain the correct pressure year-round.

Best Practices for Maintaining Optimal Tire Pressure

To keep your tires in top condition, regularly check their pressure, particularly during the cooler months. This helps in preventing issues like uneven wear or potential blowouts. A proactive approach to tire maintenance ensures better performance and longevity of your tires.


Staying Ahead of the Weather: Tire Pressure Maintenance

Regular tire pressure checks should be part of your vehicle maintenance routine, especially as seasons change. By staying vigilant and responding quickly to pressure changes, you can ensure your tires remain in good condition, providing a safe and efficient driving experience.


Securing Tire Safety Across the Seasons

Understanding and managing tire pressure in cold weather is crucial for vehicle safety and performance. Regular maintenance and knowledge can help you prevent tire-related issues, ensuring a smooth ride at any temperature. 

Before you hit the road this season, we recommend a visit to your local Grease Pro for professional assistance and expert advice. Our team is ready to help you with all your tire needs, ensuring you’re prepared for safe travels, no matter the weather!

How Long Does an Alignment Take? Wheel Alignment Questions Answered

Wheel alignment is one of the crucial maintenance steps for any vehicle. But how often should you get it done? How long does a wheel alignment take? Let’s dive into these questions and more to understand the importance of wheel alignment.

What is Wheel Alignment?

Imagine pushing a shopping cart with one wonky wheel. It keeps veering off to one side, making your grocery run a bit of a workout, right? That’s what happens when your car’s wheels are out of alignment. At its core, wheel alignment is about adjusting the angles of the wheels so they are parallel to each other and perpendicular to the ground, ensuring smooth cruises around Panama City, Florida, or wherever the road takes you. Wheel alignments help correct steering troubles, not to be confused with wheel balancing, which addresses vibration issues and uneven tire wear by ensuring all wheels spin properly. In this guide, we’ll dive into the essentials of wheel alignment, explaining it in terms everyone can understand.

Why Do I Need a Wheel Alignment?

A wheel alignment ensures your tires meet the road at the right angle, maximizing their contact with the surface. Proper alignment doesn’t just enhance driving smoothness; it extends the life of your tires, boosts fuel efficiency, and keeps you safe on the road. Misaligned wheels can lead to uneven tire wear, adversely affecting your vehicle’s performance. And, while we often think of new tires as a fresh start, even they can benefit from a checkup to ensure that everything is aligned just right, ensuring you get the most from your tires in terms of longevity and performance.

What Causes Wheel Misalignment?

Various factors can knock your wheels out of alignment. To understand better, let’s break down the main culprits:

  • Daily Driving and Wear: As you clock in more miles, suspension springs can stretch and parts can wear, leading to alignment changes.
  • Potholes and Bumps: A sudden jolt from hitting a pothole or curb can immediately shift alignment.
  • Worn-Out Components: With time, car parts naturally degrade and can affect wheel alignment.

Although replacing tires itself doesn’t directly cause misalignment, if you were already out of alignment before the tire change, your new set might wear out faster than expected.

Types of Wheel Alignments

Ensuring your wheels are perfectly aligned isn’t just about safety and efficiency; it’s also about making sure your ride is as smooth as possible. Two main types of alignments cater to different needs and vehicle types: the two-wheel alignment and the 4-wheel alignment.

2 Wheel Alignment (Front Wheel Alignment)

Also known as a front wheel alignment or simply a 2 wheel alignment, this process zeroes in on just the front two wheels. While it might seem more limited in scope, this method is ideal for cars that feature a solid rear axle. The emphasis here is adjusting the front wheels so they’re parallel to the rear wheels, which are assumed to be already aligned correctly in vehicles with a solid rear axle. At the same time, your mechanic should always take a peek at the rear axle to be sure it’s in good condition during a 2 wheel alignment just to be sure. This type of alignment is often quicker and can be less expensive, making it a good option for older vehicles or those with specific rear suspension setups.

4 Wheel Alignment

This comprehensive approach checks and adjusts all four wheels of your vehicle. It’s typically used for modern cars, especially those with independent rear suspensions or all-wheel drive. In a 4-wheel alignment, both the front and rear axles are adjusted against each other to ensure they’re perfectly parallel. This alignment ensures optimal handling and even tire wear across all tires and is the general go-to for most vehicles on the road today.

Is a 4-Wheel Alignment Necessary?

With advancements in modern car technology, many vehicles today have independent rear suspensions. This shift has made 4 wheel alignments more commonplace and important. So, you might be pondering, “Is a 4 wheel alignment truly necessary?” The answer depends on your vehicle’s make and structure, but in most cases, the answer is Yes. For cars with all-wheel drive or independent rear suspensions, a 4-wheel alignment is crucial to ensure every wheel is aligned to one another and the car handles as designed. However, for vehicles with a solid rear axle, a two-wheel alignment might suffice. Always confer with a trusted mechanic to determine the best alignment type for your specific vehicle. They’ll consider factors such as the type of suspension your vehicle has and your driving habits. Remember, regular alignments can prevent uneven tire wear, reduce fuel consumption, and improve the overall handling and safety of your vehicle.

How Long Does a Wheel Alignment Take?

On average, a wheel alignment, whether for a two-wheel-drive or four-wheel-drive vehicle, will usually be completed within about an hour or two. The exact time can vary slightly based on specific factors, but it’s generally a straightforward process and one that is worth the wait.

Factors That Affect How Long a Wheel Alignment Takes

  • Type of Alignment: While both two-wheel and four-wheel alignments are often accomplished within the same time frame, specific adjustments or conditions might occasionally extend one over the other.
  • Vehicle’s Condition: Cars that have endured more rough conditions or have aging suspension parts may need extra attention or require part replacement.
  • Previous Alignment: If a vehicle wasn’t accurately aligned during its last visit, extra time might be required to correct it.
  • Complexity of the Suspension System: Some modern vehicles with sophisticated suspension systems can take a bit longer due to their complex designs.
  • Technician’s Experience: Mechanics experienced with a wide range of vehicles, like our experts at Grease Pro, usually perform alignments more efficiently.

When Do I Need to Get an Alignment?

Generally, it’s recommended to get a two-wheel or 4 wheel alignment every two to three years. However, specific circumstances can necessitate more frequent alignments:

  • Driving Conditions: Frequently traveling on rough or uneven roads can affect alignment.
  • Accidents: Even minor fender benders can shift your vehicle out of alignment.
  • Noticed Wear: Uneven tire wear often indicates alignment issues.
  • Suspension Work: After any suspension-related repairs, checking alignment is crucial.

Do You Need an Alignment When You Get New Tires?

We seriously recommend it. Replacing old tires is a prime opportunity to ensure everything’s in sync. While it’s not mandatory, it’s beneficial to align new tires. Here’s why: Tires play a vital role in your car’s alignment. When you get new ones, especially if you’re switching types or brands, ensuring they’re properly aligned helps in maximizing their lifespan and gives you a smoother ride. Does changing tires affect alignment? Not necessarily, but a fresh set provides an ideal opportunity to ensure everything is well-aligned, ensuring you don’t have to buy tires any sooner than you absolutely have to.

Signs You Need an Alignment

Ever wondered about the signs your vehicle might be whispering (or sometimes screaming) that it’s time for a check? Here’s a hint: it’s more than just crooked steering. Let’s delve into the unmistakable indicators:

  • Crooked Steering Wheel: If the logo in the middle of your steering wheel isn’t level while driving straight, it’s a hint.
  • Uneven Tire Wear: This can manifest as more wear on one side of the tire or irregular wear patterns.
  • Vehicle Pulling: Whether it’s a subtle tug or more overt pulling to one side, it’s a clear sign.
  • Squealing Tires: This isn’t always a direct indication but can accompany other symptoms.
  • Poor Handling: If the car doesn’t respond swiftly or feels wobbly, check the alignment.
  • Steering Wheel Vibration: While this could relate to wheel balancing, it’s often an alignment issue, especially if paired with other signs.

Navigating the Road Ahead

Precision Wheel Alignments in Panama City & Beyond

In the grand scheme of car care, wheel alignments might seem like a small detail. But, as we’ve dug into them, they play a huge role in ensuring your ride is smooth, your tires last longer, and you’re not spending extra bucks on avoidable tire replacements. It’s all about getting the most out of your vehicle and ensuring safety on the road. If you’re looking for a shop to get the job done efficiently and without breaking the bank, head on over to Grease Pro in Panama City, Panama City Beach, or Chipley. Not only will you be investing in top-tier service, but you’ll also be saving both time and money. Drive safe and smart!

The Insider Scoop on Nitrogen Tire Inflation

If you’re a car enthusiast, you know that proper tire maintenance is essential. And if you’re looking for a way to step up your game, nitrogen tire inflation is the way to do it. Our technicians can help you get the most out of your tires, and we’re here to tell you all about it. 

What is nitrogen and why is it used in tires? 

Nitrogen is an essential element in the air we breathe, and it is also used to inflate tires! In fact, why more people don’t use nitrogen for tire inflation yet is a mystery. Nitrogen molecules are larger than regular air molecules, which makes them slower to escape from the tire, and more resistant to temperature fluctuations. 

How does inflating your tires with nitrogen help them last longer and perform better?

Inflating your tires with nitrogen is the smarter way to go when it comes to increasing the lifespan of your car’s tires and improving their overall performance. Nitrogen, unlike air which is 78% nitrogen anyway, is a cleaner gas that lacks moisture, reducing oxidation and preserving rubber compounds more efficiently. Because it also dissipates from the tires at a slower rate, the net result is that your tire will last longer and give you a much smoother ride. So don’t compromise on quality, get nitrogen-filled tires for optimal performance in all driving conditions.

Are there any downsides to using nitrogen to inflate your tires instead of air?

Nitrogen is a great option to inflate your tires, however, there are a few factors that should be taken into consideration before making the switch. Nitrogen is generally more expensive than air and should be done professionally by your local tire shop or Grease Pro location. Additionally, regular checks of nitrogen levels in your tires are essential if you use nitrogen for inflation and want to get the full benefit from this method. Luckily, you can check tire PSI the same as you would with an air-filled tire, by using a tire pressure gauge connected to the tire valve stem. 

Get your tires inflated with nitrogen at Grease Pro. 

If you’re looking for an easy and cost-effective way to upgrade your tire maintenance routine, consider getting your tires filled with nitrogen at your nearest Grease Pro location. Nitrogen provides superior inflation performance compared to conventional air alone, improving fuel efficiency and increasing the lifetime of your tires. Filling your tires with nitrogen is surprisingly affordable and it’s one of the easiest ways to ensure a smooth driving experience. So why not swing by and ask about getting your tires filled with nitrogen at your neighborhood Grease Pro location today?

Schedule an appointment for nitrogen inflation today!

5 Causes of Tire Tread Wear – And How to Avoid Them

One of the most important aspects of vehicle maintenance is keeping your tires in good condition. Not only does proper tire care improve your car’s performance, it also helps to keep you safe on the road. One common problem that can occur with tires is tread wear. This occurs when the rubber on the tire wears down, eventually leading to a blowout. In this blog post, we will discuss the five main causes of tire tread wear and how to avoid them.

1. Driving on Rough Roads

One of the most common causes of tire tread wear is driving on rough or unpaved roads. The uneven surface of these roads can cause the tire to flex and bend, which wears down the tread over time. If you must drive on an unpaved road, make sure to go slow and avoid any large potholes or rocks that could damage your tires.

2. Overinflated Tires

Another common cause of tire tread wear is overinflation. When a tire is inflated to more than the recommended pressure, it puts extra stress on the sidewalls and tread. This can cause the tread to wear down prematurely. Always check your owner’s manual or the placard on your door jamb to see what the recommended tire pressure is for your vehicle.

3. Underinflated Tires

Conversely, if your tires are underinflated, this can also cause tread wear. When a tire is not inflated to the proper pressure, it puts extra stress on the center of the tread. This can cause the tire to wear down in the middle first, eventually leading to a blowout. Always check your tire pressure regularly and inflate to the recommended pressure when necessary.

4. Misaligned Wheels

If your wheels are out of alignment, this can also cause premature tread wear. When a wheel is misaligned, it causes the tire to rub against the road surface unevenly. This will wear down the tread on one side of the tire more than the other, eventually leading to a blowout. You can tell if your wheels are out of alignment, if your car seems to pull to one side when you’re driving or if your tires are wearing unevenly. If you suspect your wheels are out of alignment, take your car to the Grease Pro nearest you to have them checked and adjusted as necessary.

5. Worn Suspension Components

Another common cause of tire tread wear is worn suspension components. When shocks or struts become worn, they can’t absorb bumps as well, which puts extra stress on the tires. This will cause the tread to wear down prematurely. If you notice that your car is bouncing more than usual or that the ride is rougher than it used to be, have your suspension checked by a mechanic.

These are just some of the most common causes of tire tread wear. By being aware of them, you can help to prevent premature tread wear and extend the life of your tires. If you do experience tread wear, bring your car to Grease Pro for all your tire service, repair, and replacement needs. We have a full range of tires for any vehicle and can help you find the perfect ones for your driving needs. Contact us today to learn more!